1. Requirements and Preparation
Time tracking is not a feature of older subscriptions or of Basic+ with absences. Please write to us in the chat or call us if you would like to test time tracking retrospectively.
Our time tracking is kept very simple and flexible. It is possible to record net working hours and breaks.
In our terminal, employees can start/pause/end time tracking. These can be accessed via a computer at the workplace, on a smartphone, or for example, through a central tablet at the entrance.
Terms:
Check-In = starting time tracking, clocking in
Check-Out = ending time tracking, clocking out
Timer = recorded time, a time tracking entry, time booking.
2. Settings
Navigate to the Time Tracking tab and then click on "Settings".
01. Breaks
Time tracker - Settings - 01 Time Tracking: Breaks in minutes
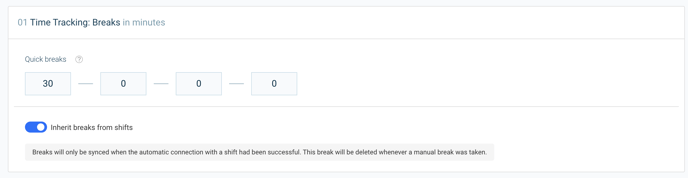 Typically, fixed values in minutes can be entered for smoke breaks or occasional lunch breaks. This means that the employee does not have to check in and out for the break, but only needs to log in to the terminal once and select the break, which will then be deducted from the gross working time.
Breaks are only taken into account if the automatic linking with a shift was successful. They will be deleted if a manual break is added.
Breaks from the shift planning can also be taken into account, but this only works if the automatic linking of the time tracking with a shift that includes a break from the weekly schedule has worked (see below for "Grace period for automatic linking").
02. Adjustment of times
Time tracker - Settings - Adjustment of times
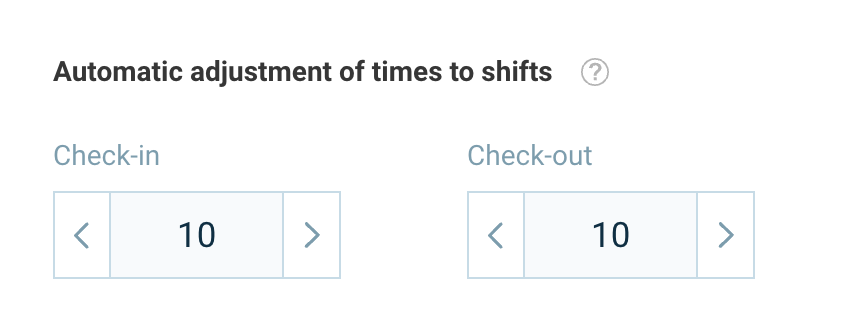
Example: Check-in: Your employee checks in at the terminal at 7:52 AM, but the shift start time is not until 8:00 AM. If the grace period is set to 10 minutes, the time tracking will only start at 8:00 AM. If clocked in at 8:03 AM, the time tracking will also start at 8:03 AM. If clocked in at 7:40 AM, the time tracking will also start at 7:40 AM.
Check-out: Employee clocks out at 5:09 PM, but the shift end time is at 5:00 PM with a grace period of 10 minutes. The timer will now end at 5:00 PM. If clocked out at 4:59 PM or 5:11 PM, it will also be reflected accordingly in the timer.
However, this only works if the automatic linking of the timer with a shift that includes a break from the weekly schedule has worked (see below for "Grace period for automatic linking").
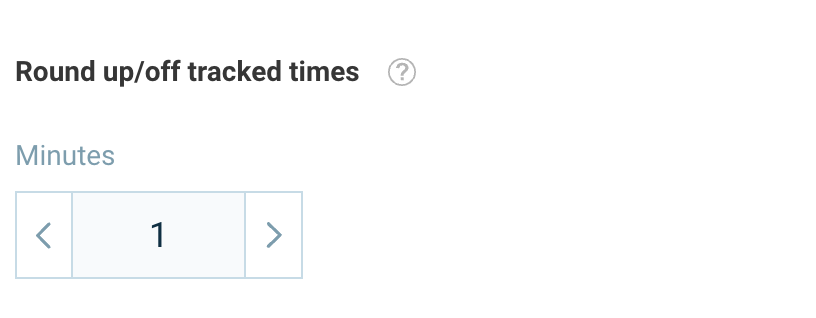
Here you can specify how many minutes the times should be rounded to during check-in/check-out.
Example: If 0 is entered here, the timer will end down to the second. If 1 is entered, the timer will end down to the minute. If 5 is entered, the timer will be rounded up or down to the nearest multiple of 5 minutes based on the statistical mean, and so on.
If no linking and adjustment to a shift takes place, the timers can also be rounded.
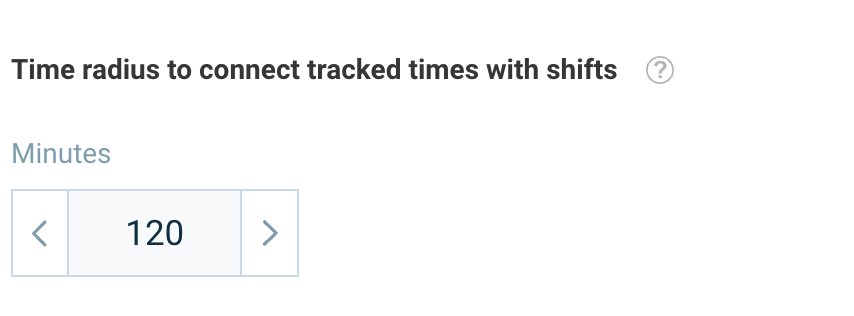
The key factors are the start of the shift and the check-in time. Here, you can select a radius in minutes around the shift start time.
If the start of the time recording falls within this radius, the closest shift from the weekly schedule will be linked to the timer. This allows for a comparison between scheduled and actual working hours, as well as adjustment to the shift from the weekly schedule and the inclusion of unpaid breaks (see above). Only ONE shift can be linked. Therefore, a break should always be scheduled in the FIRST shift of the day.
Example: Shift 08:00 - 16:00. Radius for linking = 120 minutes. Time recording starts at 09:36. Difference to shift start = 96 minutes < 120 minutes, so a linking takes place.
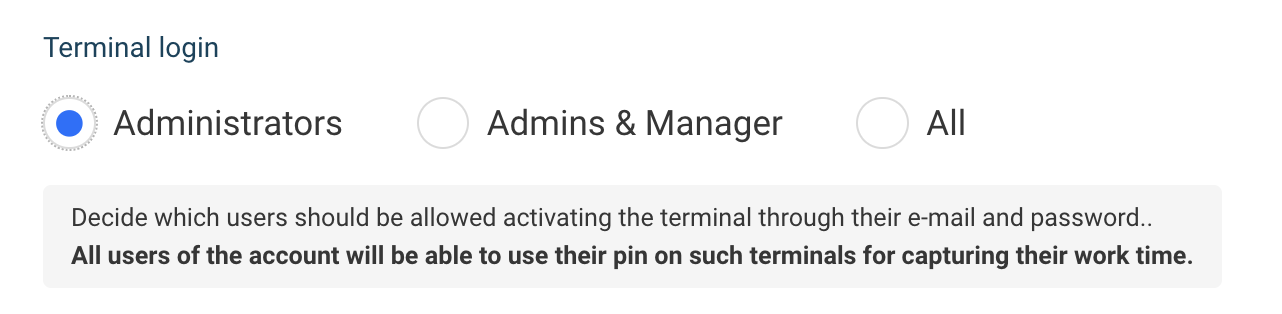
03. Permissions
Time tracker - Settings - 04 Permissions
Determine who can log in with their email and password on the terminal to activate it.
a) Single-user mode
Selection during login at the terminal (see point 5 for more information).
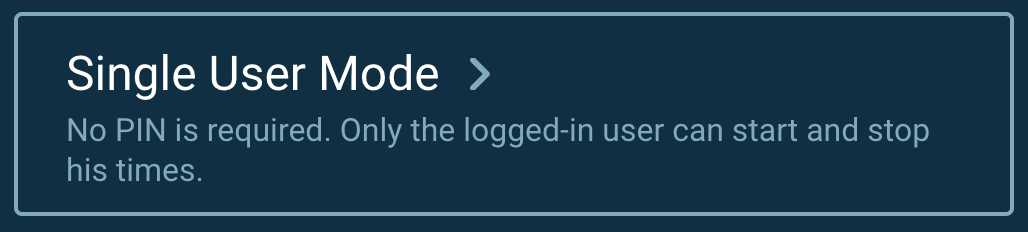

Usage without PIN:
If employees should be able to use time tracking on their individual smartphones without a PIN, then "All" can be clicked at this point.
This enables the use of employee login data in the terminal. If they select the single user mode, they can only record their own times there, without a PIN.
If there were admin logins stored in the terminal so far: An admin must enter their PIN and log out of the terminal. Only then, if the setting allows it, can the employee use their own login to activate the terminal for themselves.
b) Multi-user mode
Selection when logging in at the terminal (see more under point 5)
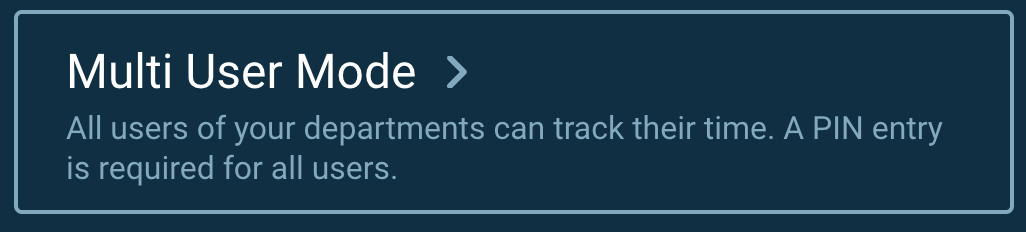
A terminal activated by the admin on a central device can be used by all employees with their PIN.

If "Admins & Managers" are selected, then employees who share a workspace with the manager can use a terminal activated by the manager with their own PIN.
3. Usage in the web browser
- Navigate to time tracker
- Click on 'Web Terminal'
- Activate the terminal with your regular login credentials on Staffomatic.
- Select 'Start time tracking'
The terminal can also be used as a mobile app, see below at 5 for more information.
4. PIN
- With the PIN, anyone can log in to a terminal of the same account that was unlocked by an admin or manager who is assigned to the same work area in multi-user mode. See more above under permissions.
- Create your first PIN via "Create PIN" in Time Tracking or in your own employee profile.
- Remember the PIN - an email with the PIN will be sent to you in parallel.
- The PIN cannot be personalized/selected.
- It can be created multiple times for a profile. Please make sure to always use the current (i.e. last assigned) PIN.
- It is always communicated additionally by email notification.
- Admins or authorized managers can create a PIN for others in the respective employee profile.
- Employees can create their own PIN in Time Tracking.
5. Terminal
The term refers to our "electronic punch or stamp clock". Here you can:
- start or stop time tracking.
- start or stop a break.
- select a pre-defined fixed break. You can learn how to set up pre-defined breaks above under point 2, Settings.
Logging in to the terminal with email + password is done either by admins & managers at central devices or by individual employees themselves at their own devices, depending on the settings in the permissions (see above 03).
Daily login to start time tracking is done:
-
via PIN in multi-user mode
An admin/manager activates the usage once through email + password on a central device. Employees then log in via PIN. -
via email + password in single-user mode, by employees themselves on their own device.
The time recording terminal is available via web browser or it can be downloaded in the App Store or on Google Play.
6. Control and correction
What is displayed where and how can I edit entries?
01) Tiime Tracker - Dashboard
-
Tracked times of the past seven days
-
Right column: Running timers
02) Time Tracker - tracked times
- View of all tracked timers - view options freely definable.
- Tick: Confirm working time by clicking on the small tick.
- Pen: Simple changes by clicking on the pen.
- i: Log of the timer by clicking on the i.
- Chain: Linking of timer with shift. If the chain symbol is "closed", the shift is linked.
If the chain is still "open", no shift is linked. - Magnifier: Detail editing by clicking on the magnifier.
- Detail editing can also be opened by clicking on the data of the time recording (under Period).
The scheduler can also stop, confirm or delete multiple timers simultaneously.
In addition, the "Linked" filter can now be used alongside the "Employee", "Department" & "Status" filters
How to edit a timer:
- Breaks can be added or changed by clicking on "Edit" in the upper right corner of a timer.
- Linking to a shift from the weekly schedule - Click on "Link" in the opened recorded working time on the top right under the heading Weekly schedule.
In addition, it is possible to see the location & department at a glance. - Here you can also view the log of whose terminal login was used to create the timer and who made what changes and when.
- On the right under the weekly schedule you will also find a link to the log.
To manually create a timer, click on the top left blue button 'create a timer' under tracked times.