
What can the integration do?
Different synchronizations can be performed with the integration:
- Create user (One Way Sync > Personio to Staffomatic)
- Absences (both ways Sync > Personio to Staffomatic OR Staffomatic to Personio)
- Time Tracking (One Way > Staffomatic to Personio)
- Lock users (One Way > Personio to Staffomatic)
What do I need for the integration?
To use the API, a subscription in both systems, Staffomatic and Personio is necessary.
If possible, Try to perform the setup within the test phase at Staffomatic.
Depending on what data is needed and should be synchronized, the right subscription must be chosen!
If you want to synchronize absences, you need Basic + Absences
If you want to synchronize time tracking, you need Basic + Time-Tracking
If you want to synchronize both, you need Professional OR Premium
In addition to the correct subscription, you need to consider how the API will be managed:
Only one admin user can manage the integration in Staffomatic
If the management of the API is to be carried out by several users, a general admin profile can be created with which the users can log in. For example, admin@yourcompany.com
If the responsible user for API needs to be changed, this can only be done in several steps.
For the change of the responsible user the Enable background sync setting, which can be found in the API settings (see below), must be deactivated for the current responsible admin and activated for the new responsible admin.
Settings in Personio:
1) First, a credential must be created in Personio. This is information that our API needs to know which accounts should be connected.
Here you have the option to make a note of the information and enter it manually into Staffomatic later, or you can create a credentials file that can easily be uploaded to Staffomatic later.
To do this, please go to Personio Settings > Integrations > API Credentials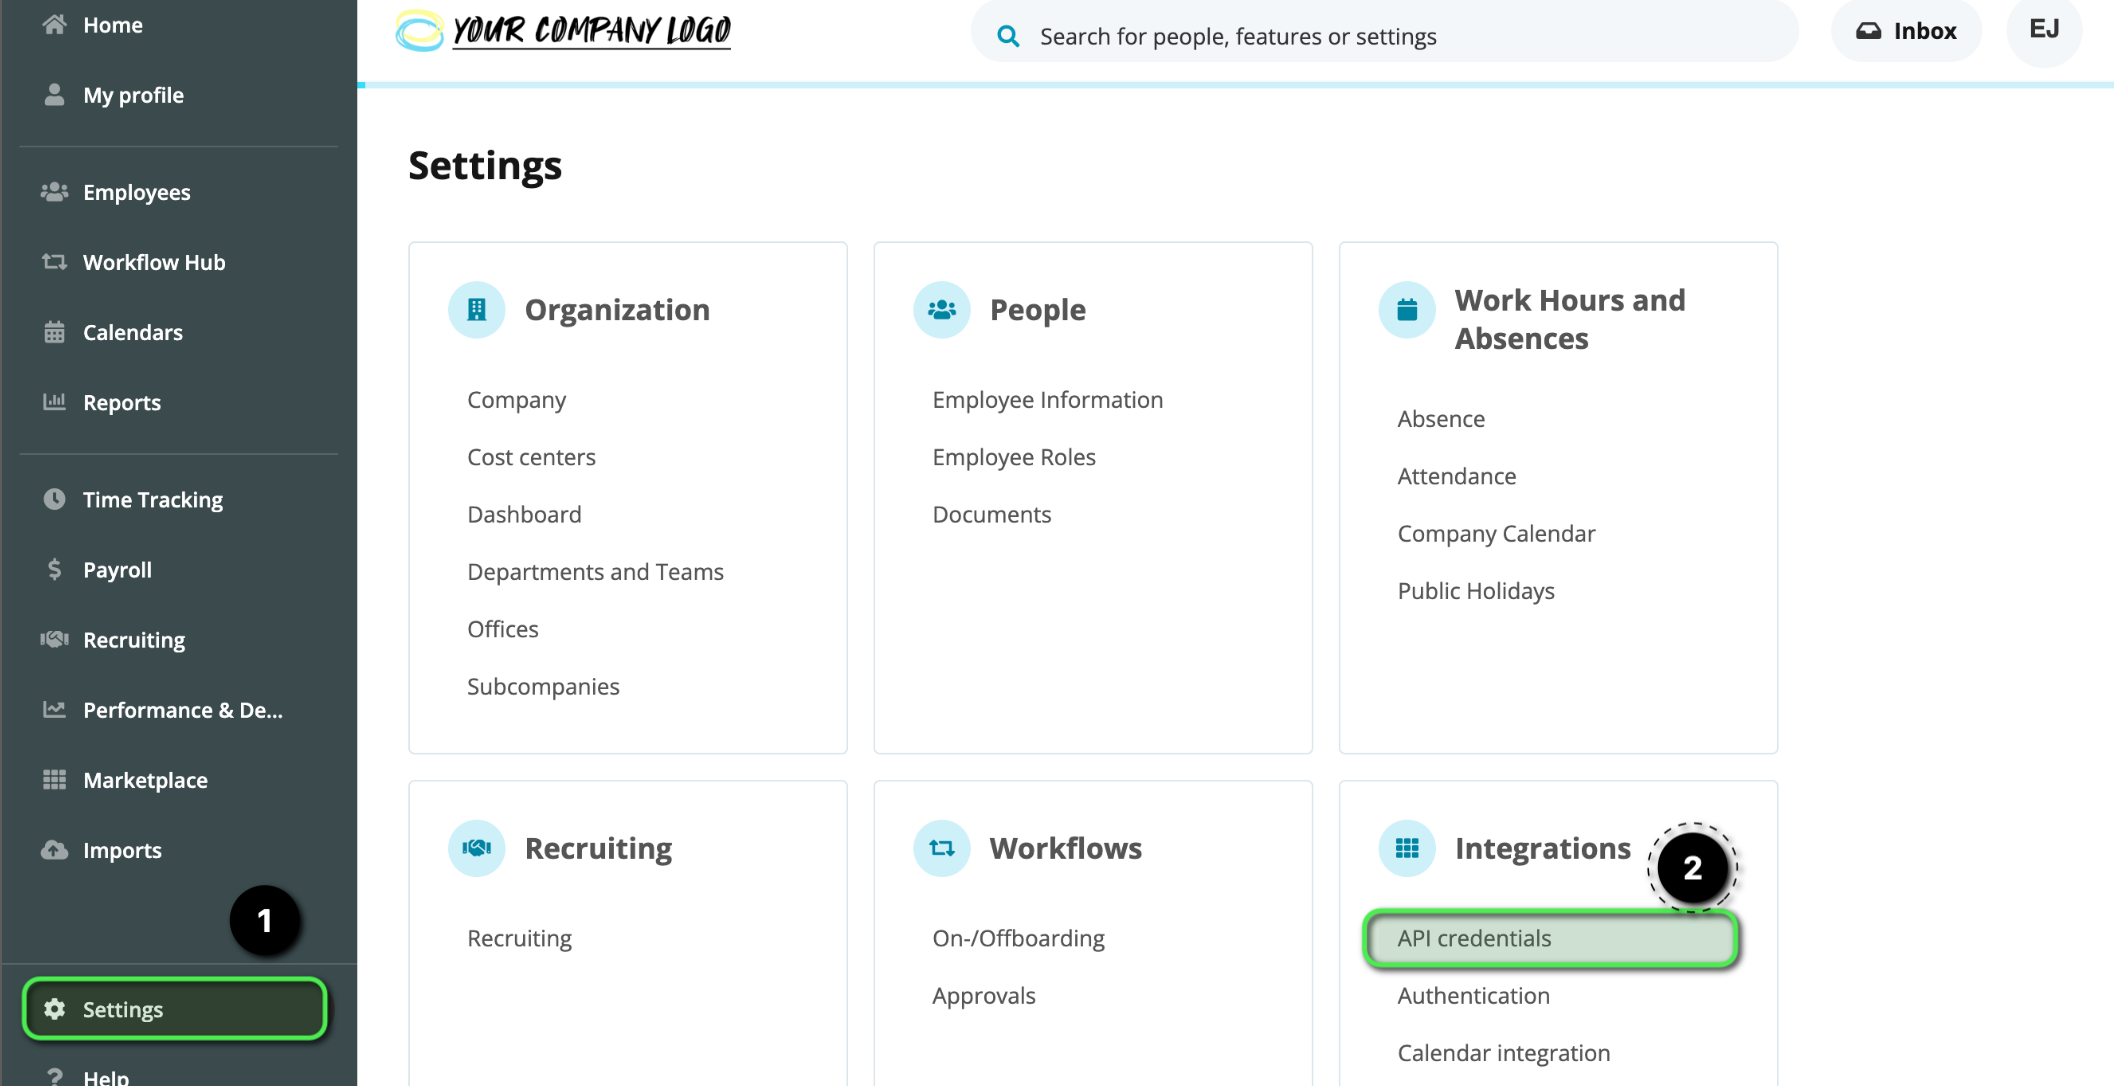
2) Second, is to define which information is to be accessed via the API. Here you have to select the necessary attributes.
Please click on "Generate new Credentials" in Personio and fill in the fields.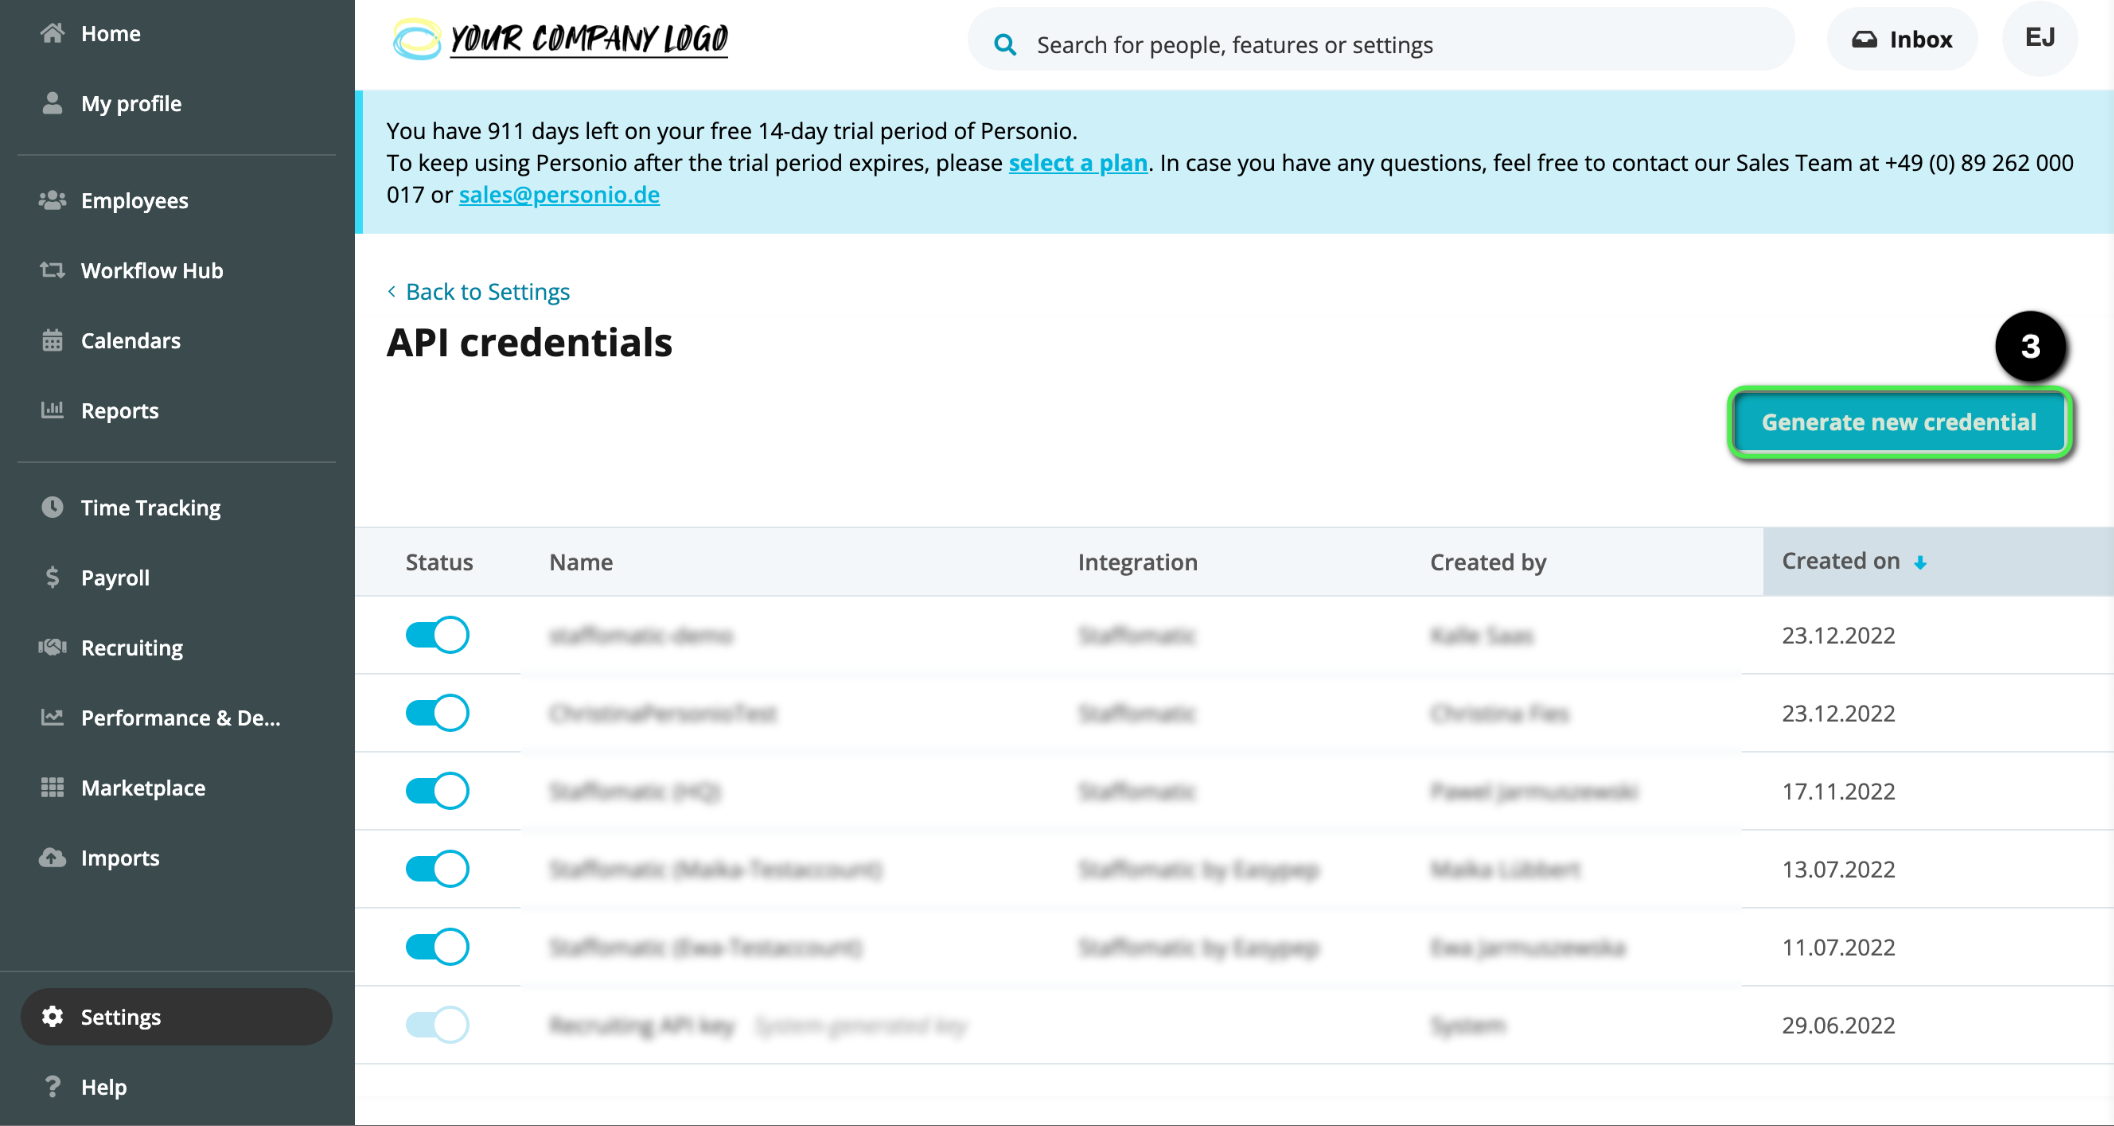
Total 12 Readable employee attributes > Required attributes must be active here, otherwise errors may occur in the API:
- Department
- Email
- First name
- Hire date
- Last day of work
- Last name
- Office
- Subcompany
- Team
- Vacation day balance
- Weekly hours
- absence entitlement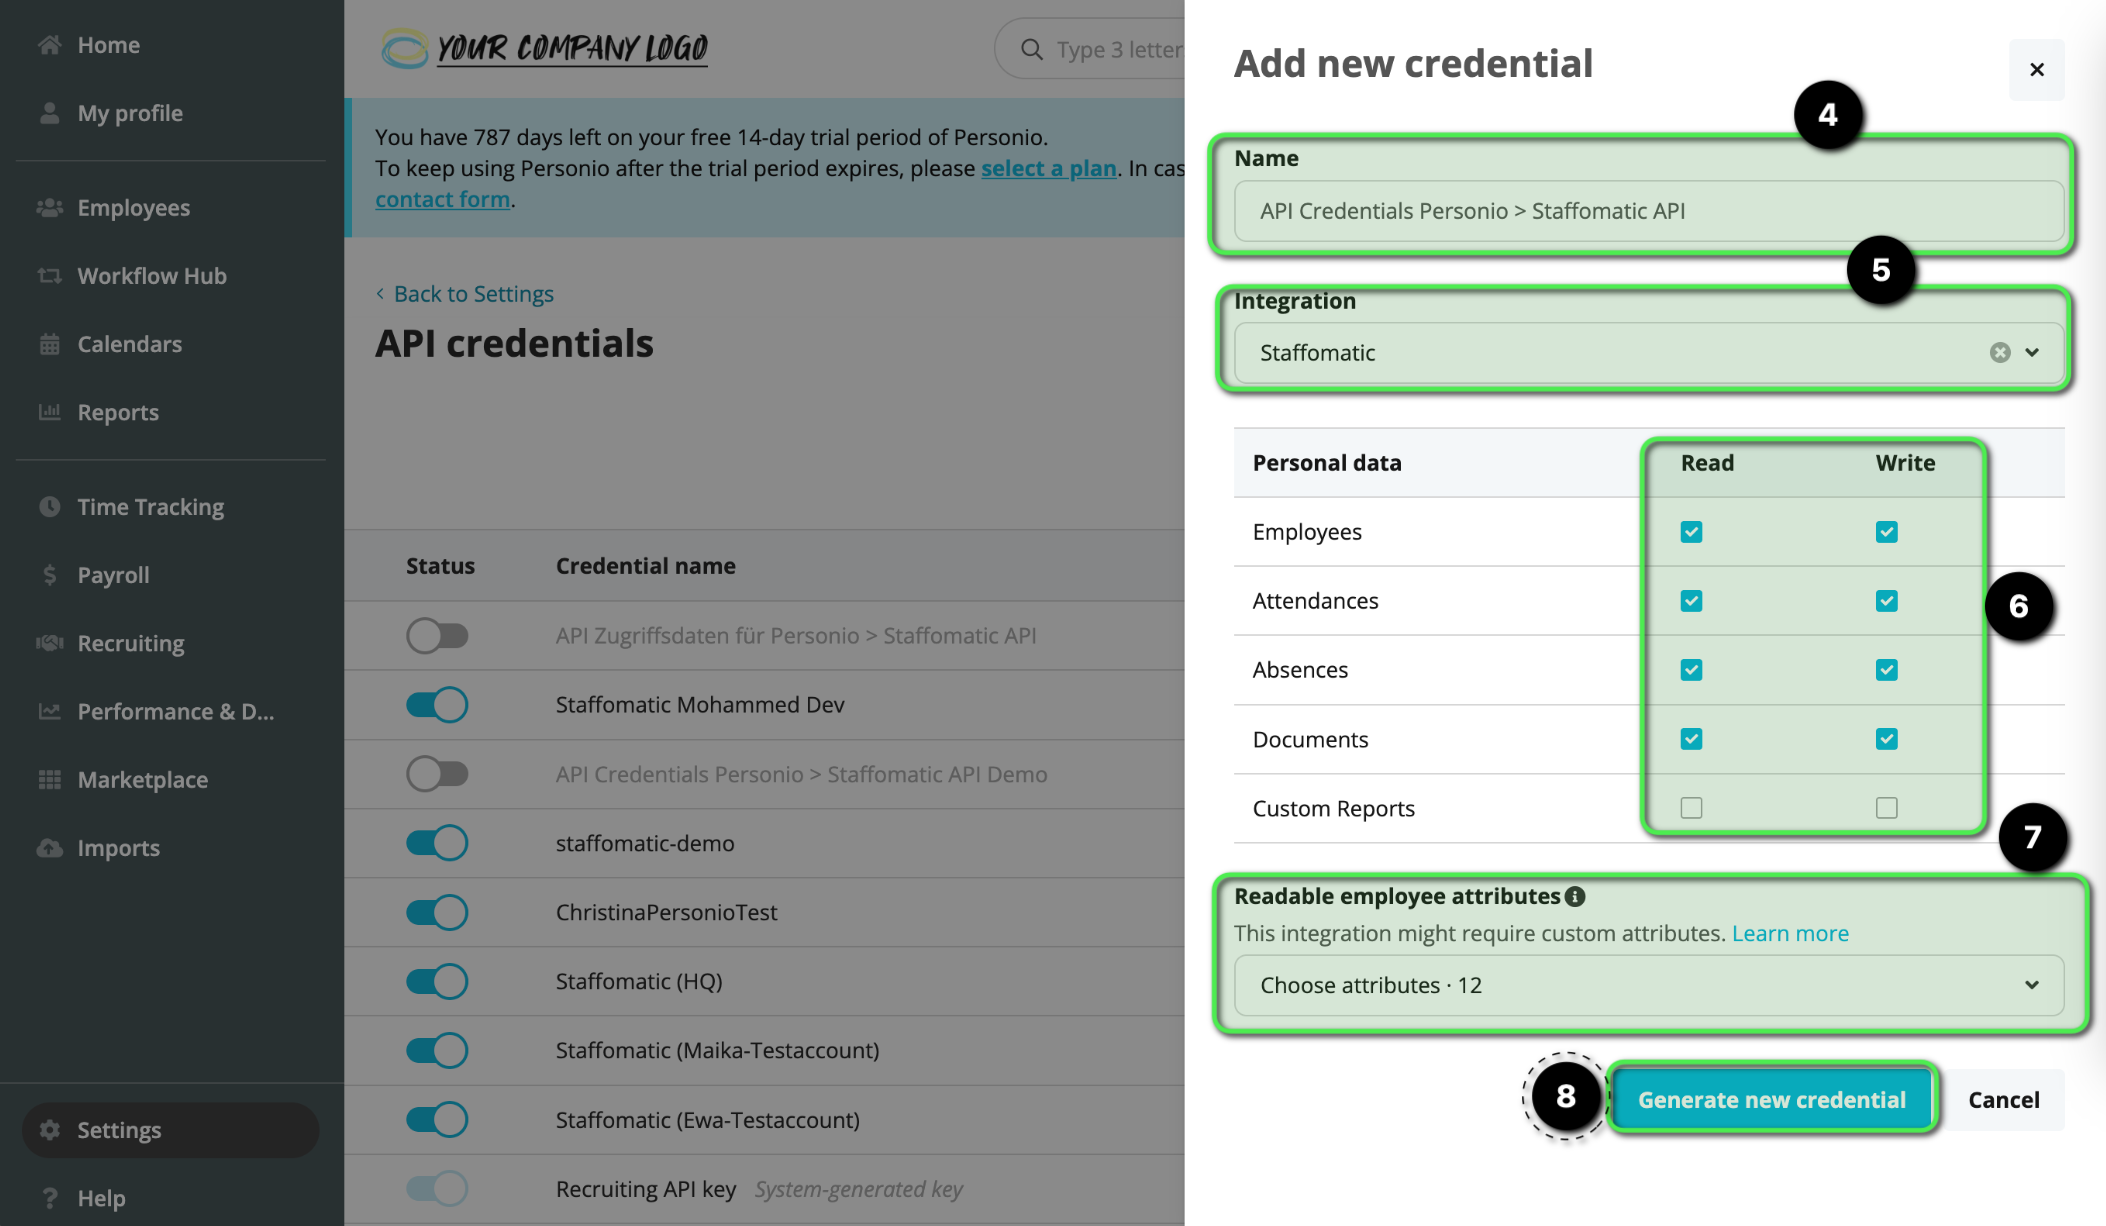
3) Third, copy your API access data and paste it into the integration at Staffomatic. 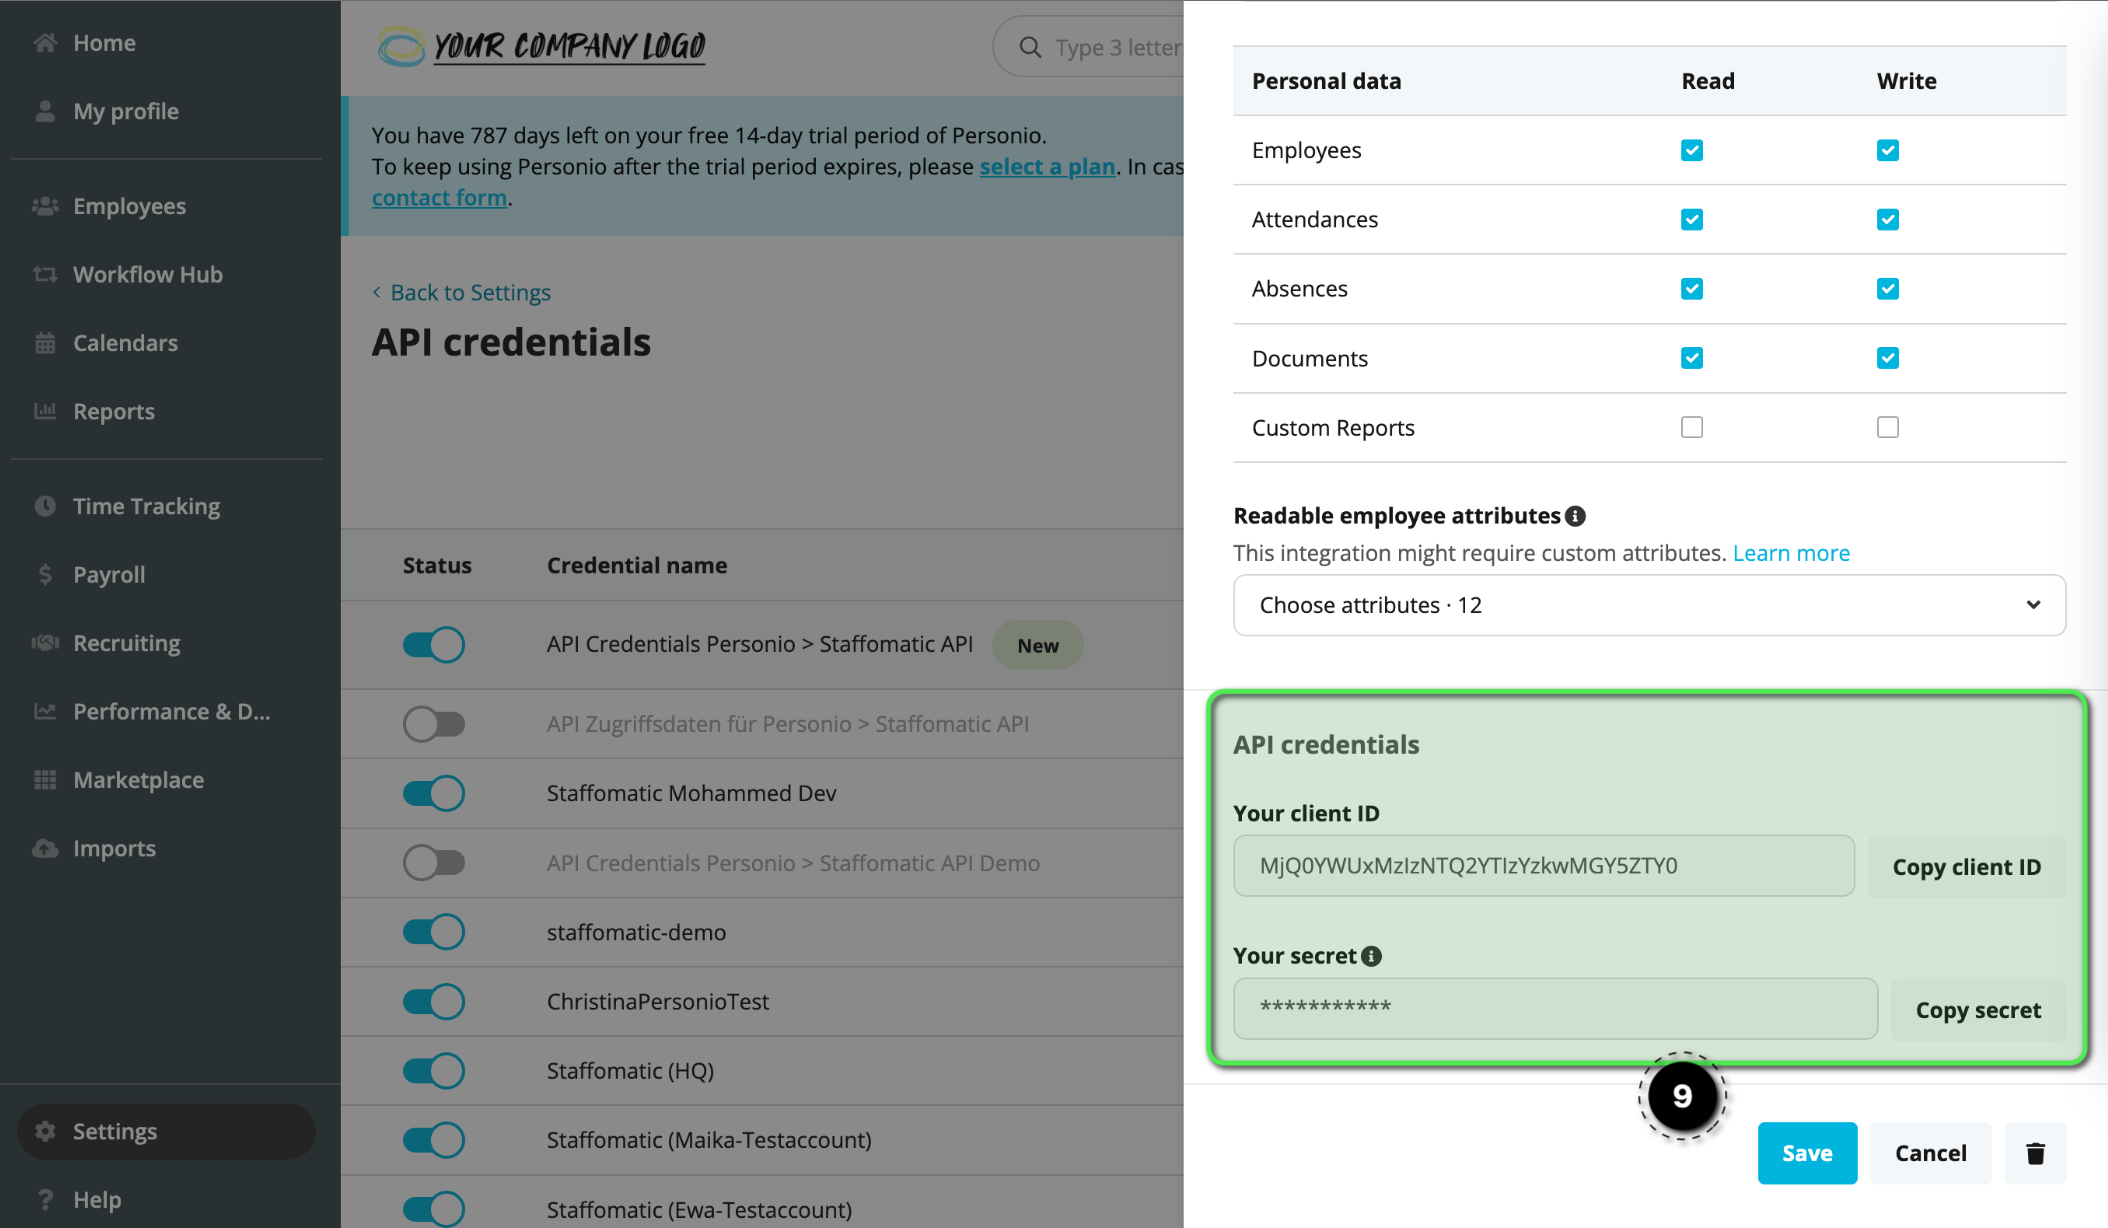
IMPORTANT: Before you set up the API between Staffomatic and Personio, revise your data in Staffomatic
- Delete all test users, because these are pushed by Personio into Staffomatic and then duplicate employees can be displayed. In this case, the system cannot determine whether it is the same person, for example, if email addresses are missing.
- Users who absolutely have to stay (because they are already scheduled) must have the same e-mail address as they have with Personio. Only then can matching take place.
- Delete all absences that you have created in your test phase, because otherwise absences could be created twice. (Exception: you want to maintain the absences in Staffomatic and push them to Personio).
- Delete all test timers that you have created in your test phase at Staffomatic. This way you avoid that incorrect test data is pushed to Personio.
Please book a consultation appointment with us for the implementation of the API. Simply use the following link:
https://meetings.staffomatic.com/meetings/pawel/personio
Don't do it alone!
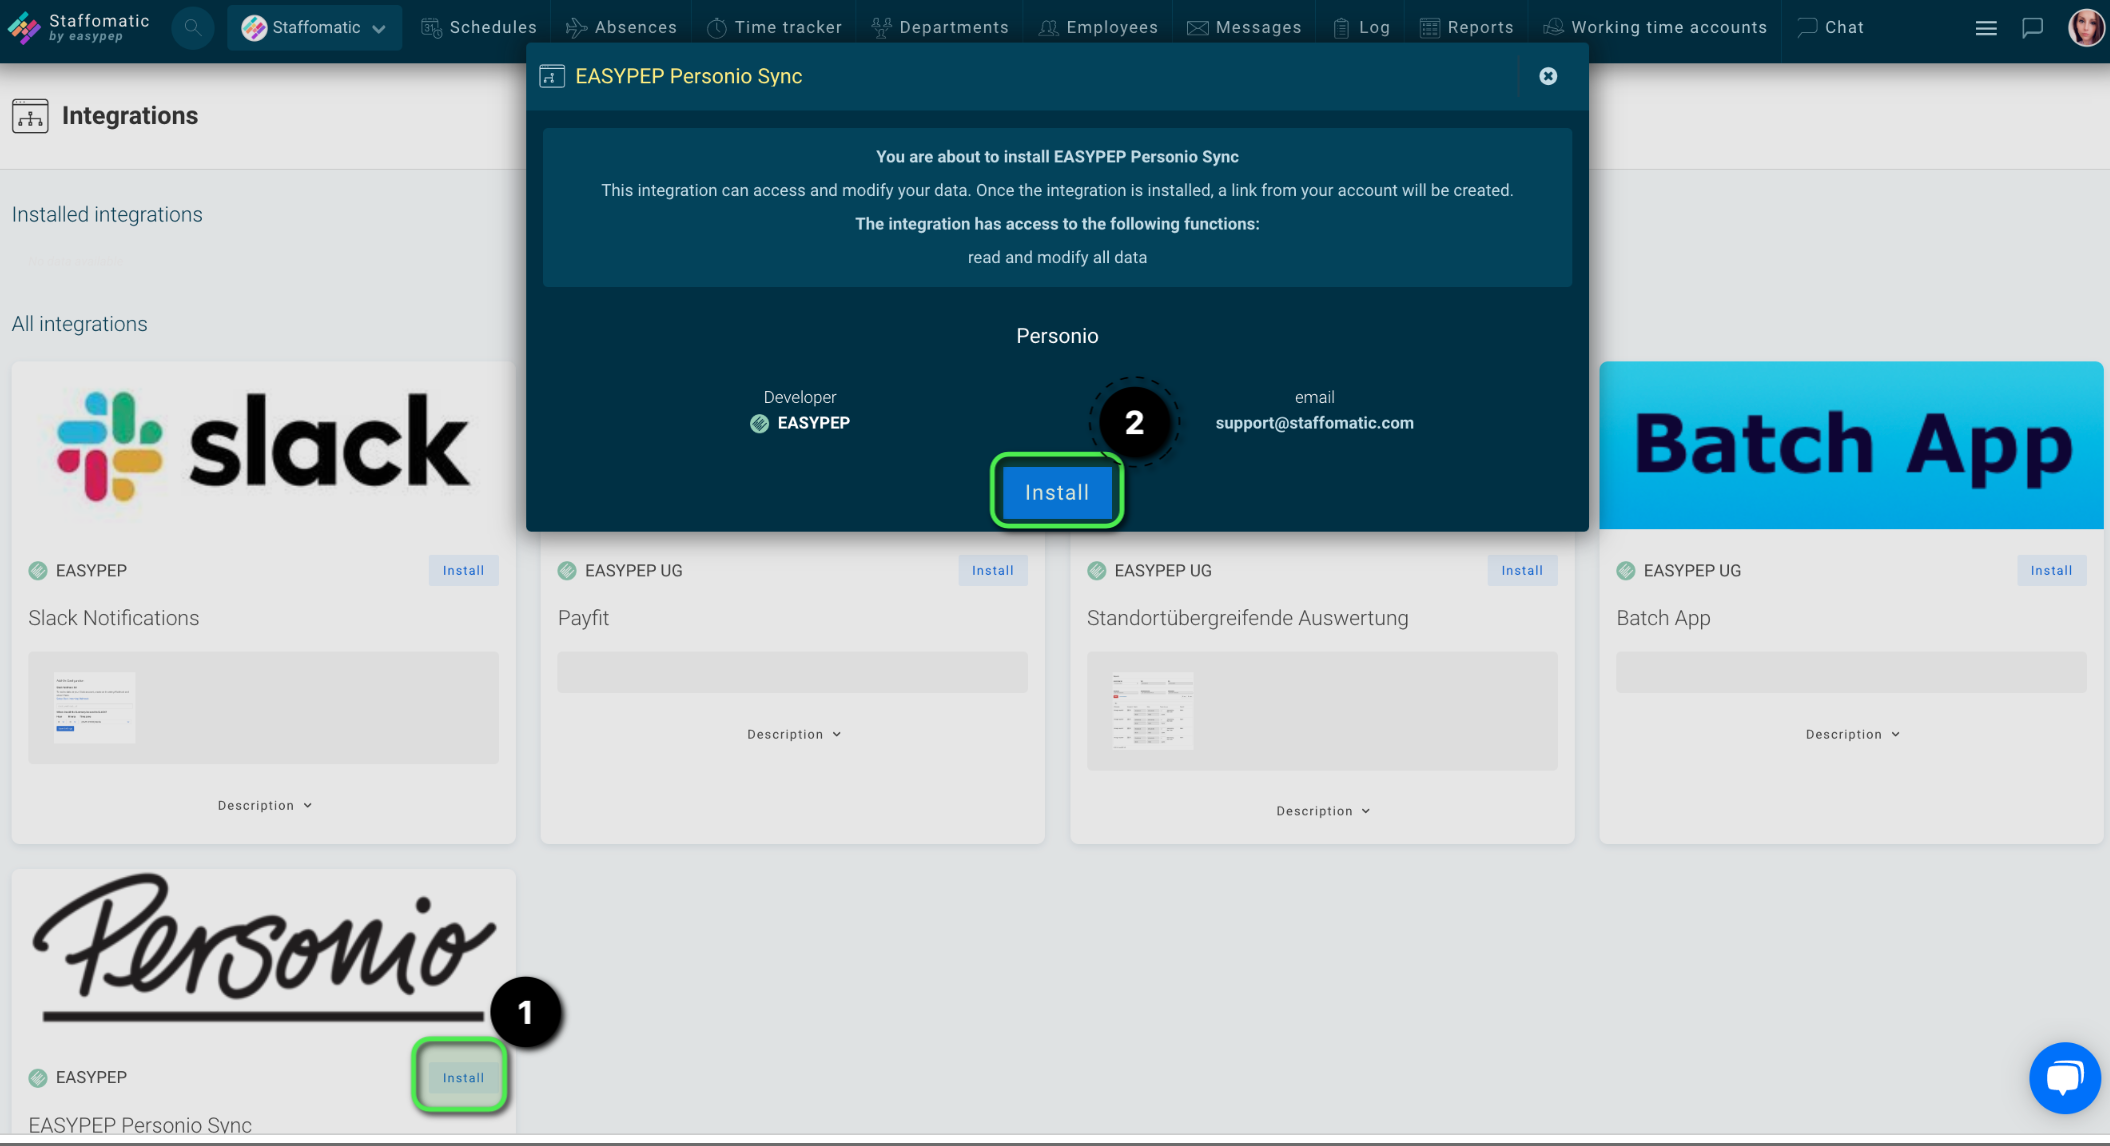
Settings in Staffomatic:
1. go to the Integrations tab in Staffomatic and select the Personio integration. Follow the installation instructions.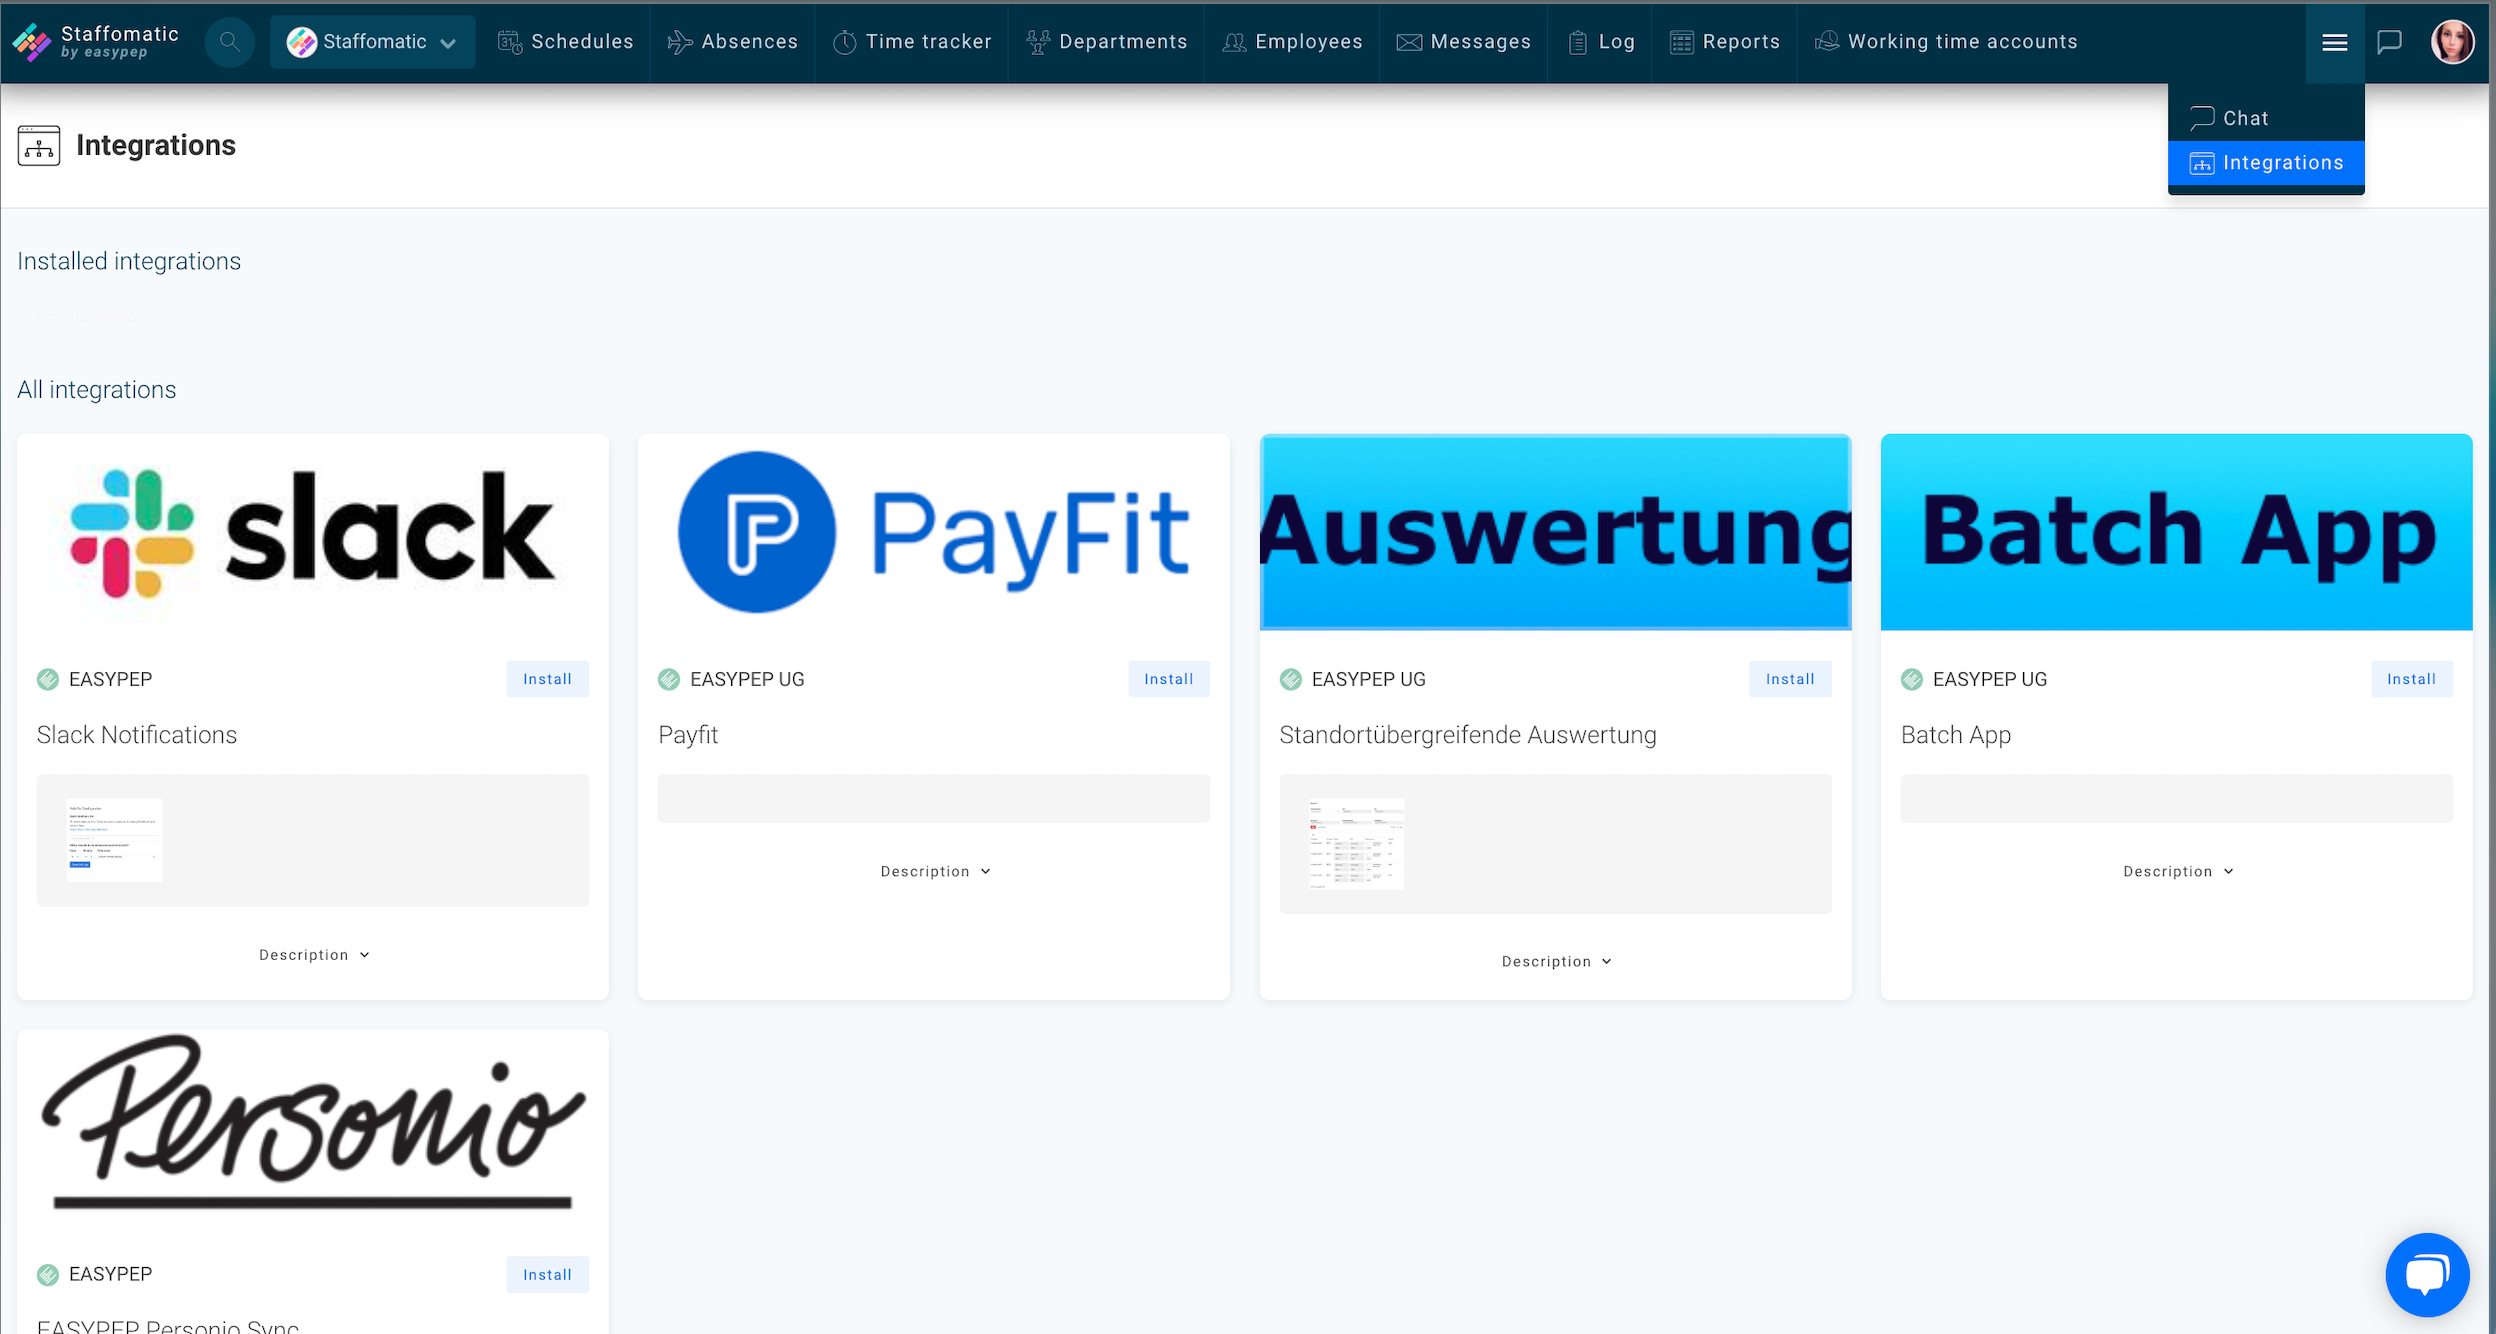
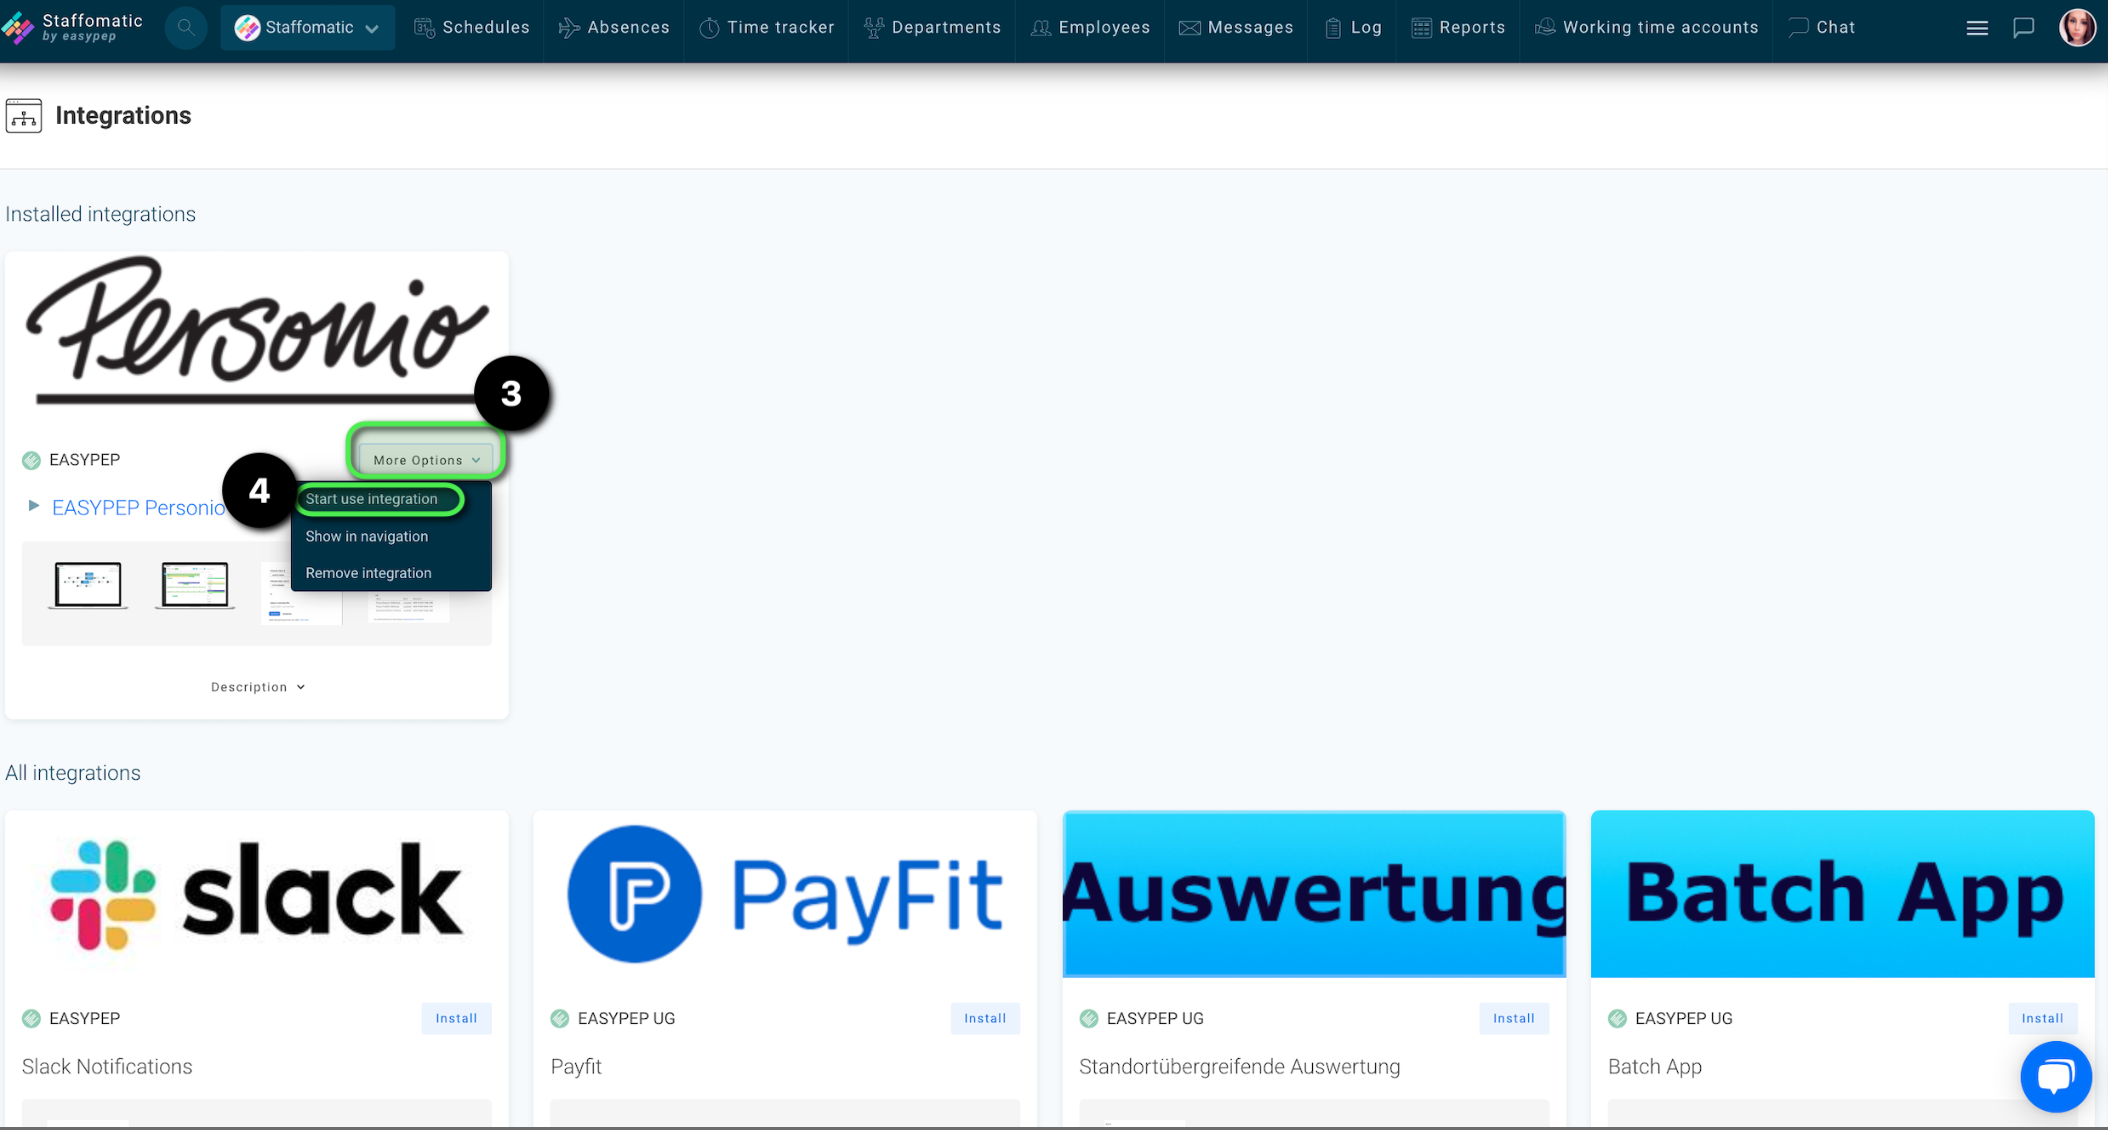
Now please click into the installed integration and start the setup. The setup consists of only four small steps. In the first step you have the possibility to enter the credentials information.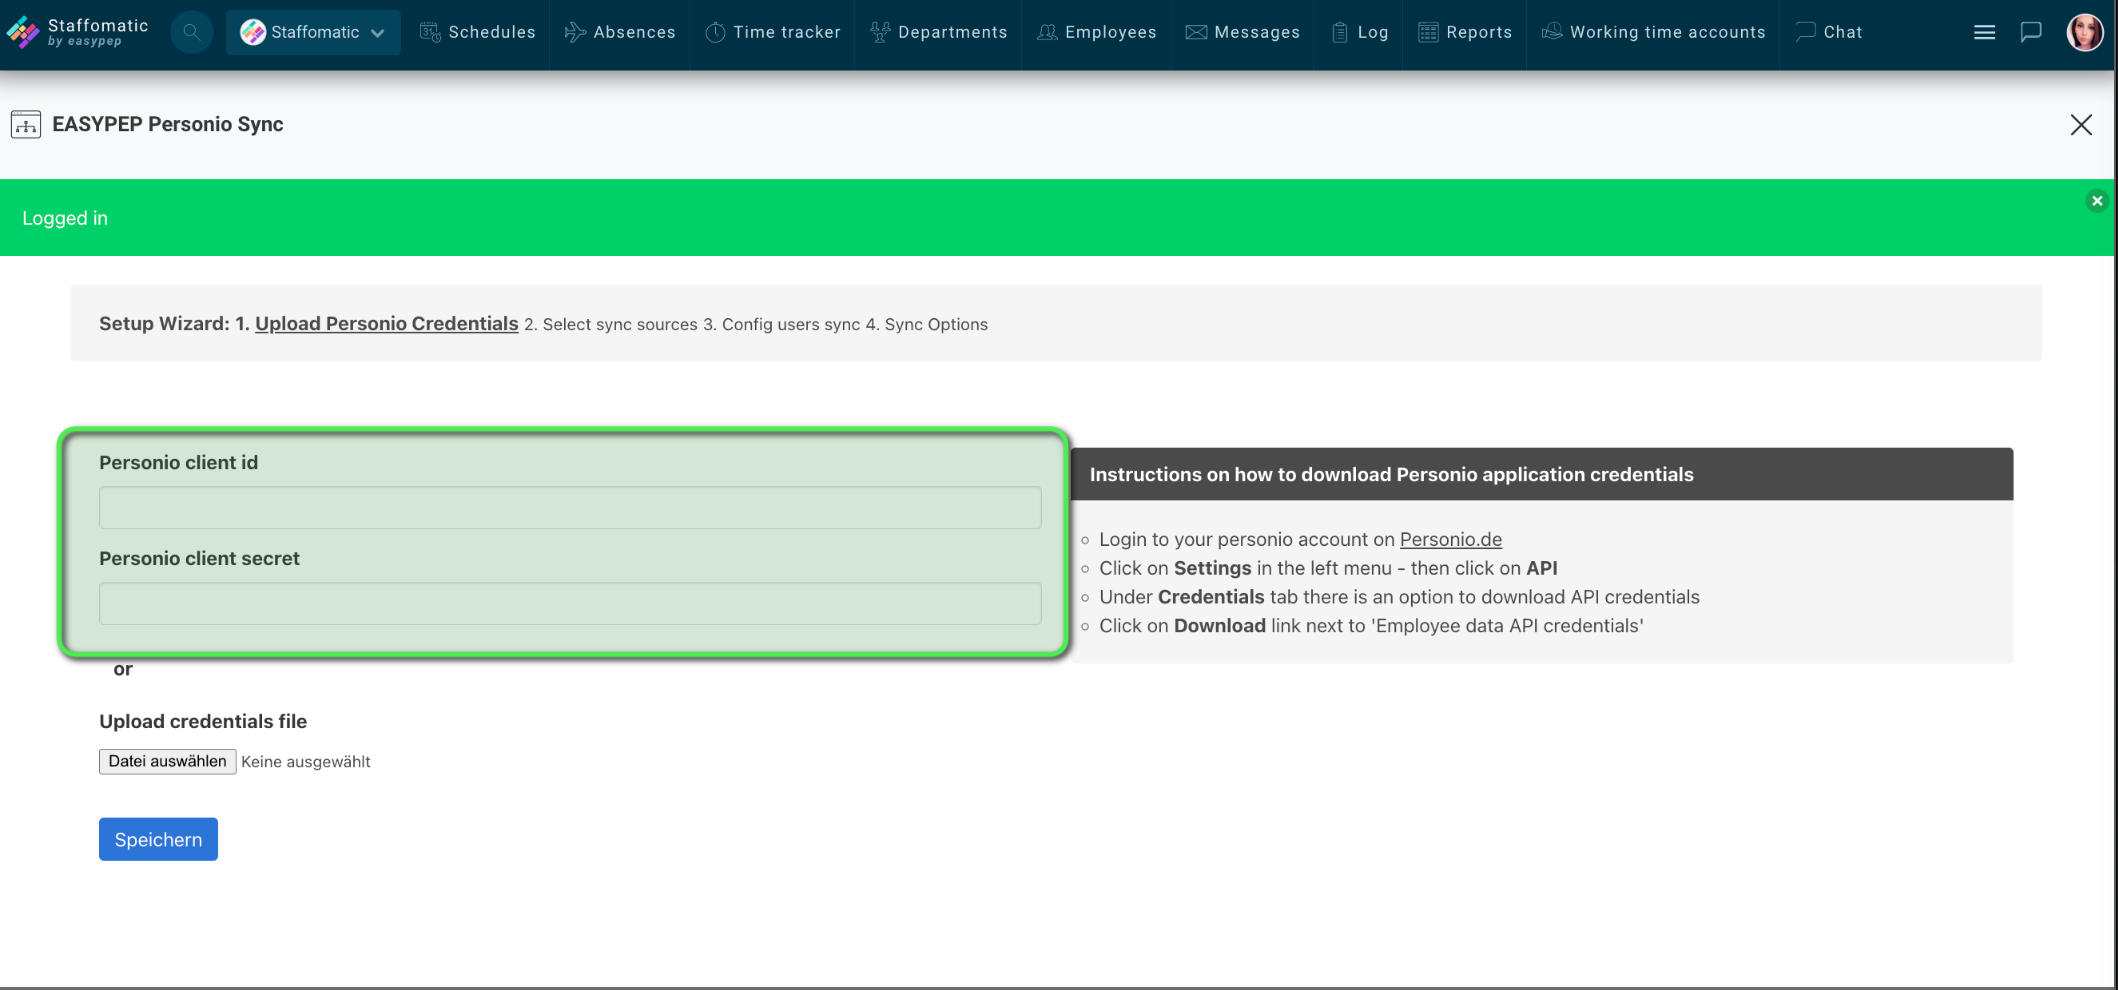
3. Definition of the information sources (2. Select sync sources)
The employee - data can only be synced from Personio to Staffomatic. Therefore, there is no further setting option here.
If you want to change employee data later, the change must be made in Personio.
If a change is made to the data in Staffomatic, it will be visible at the next sync.
At the second point you can decide if the time tracking tracking should be synced from Staffomatic to Personio or if you want to disable this setting.
The third point defines from which system the absences should be pushed. Here you have the possibility to set Personio as well as Staffomatic as the leading system.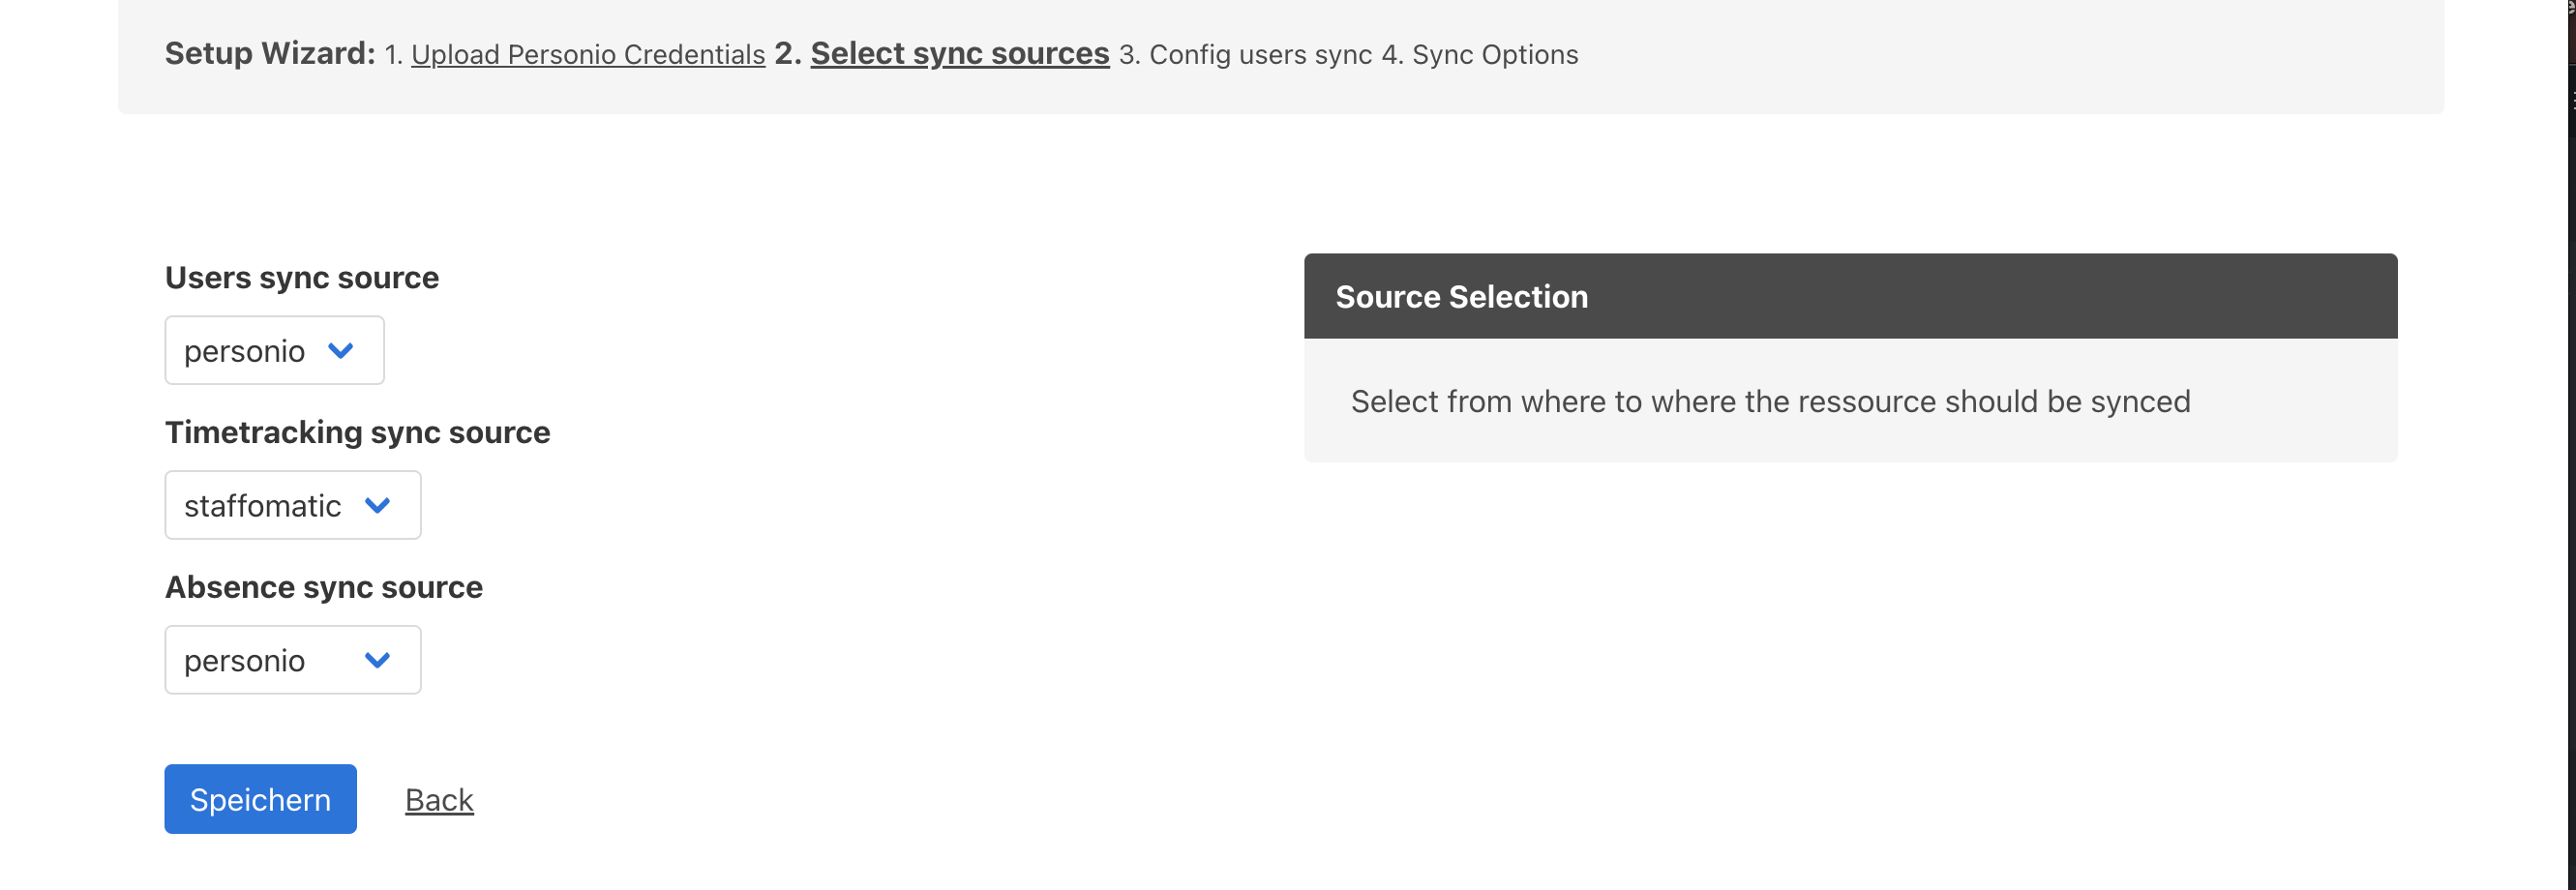
Now please click on Save and wait a moment.
The system queries the employee data via the API. This may take a few seconds,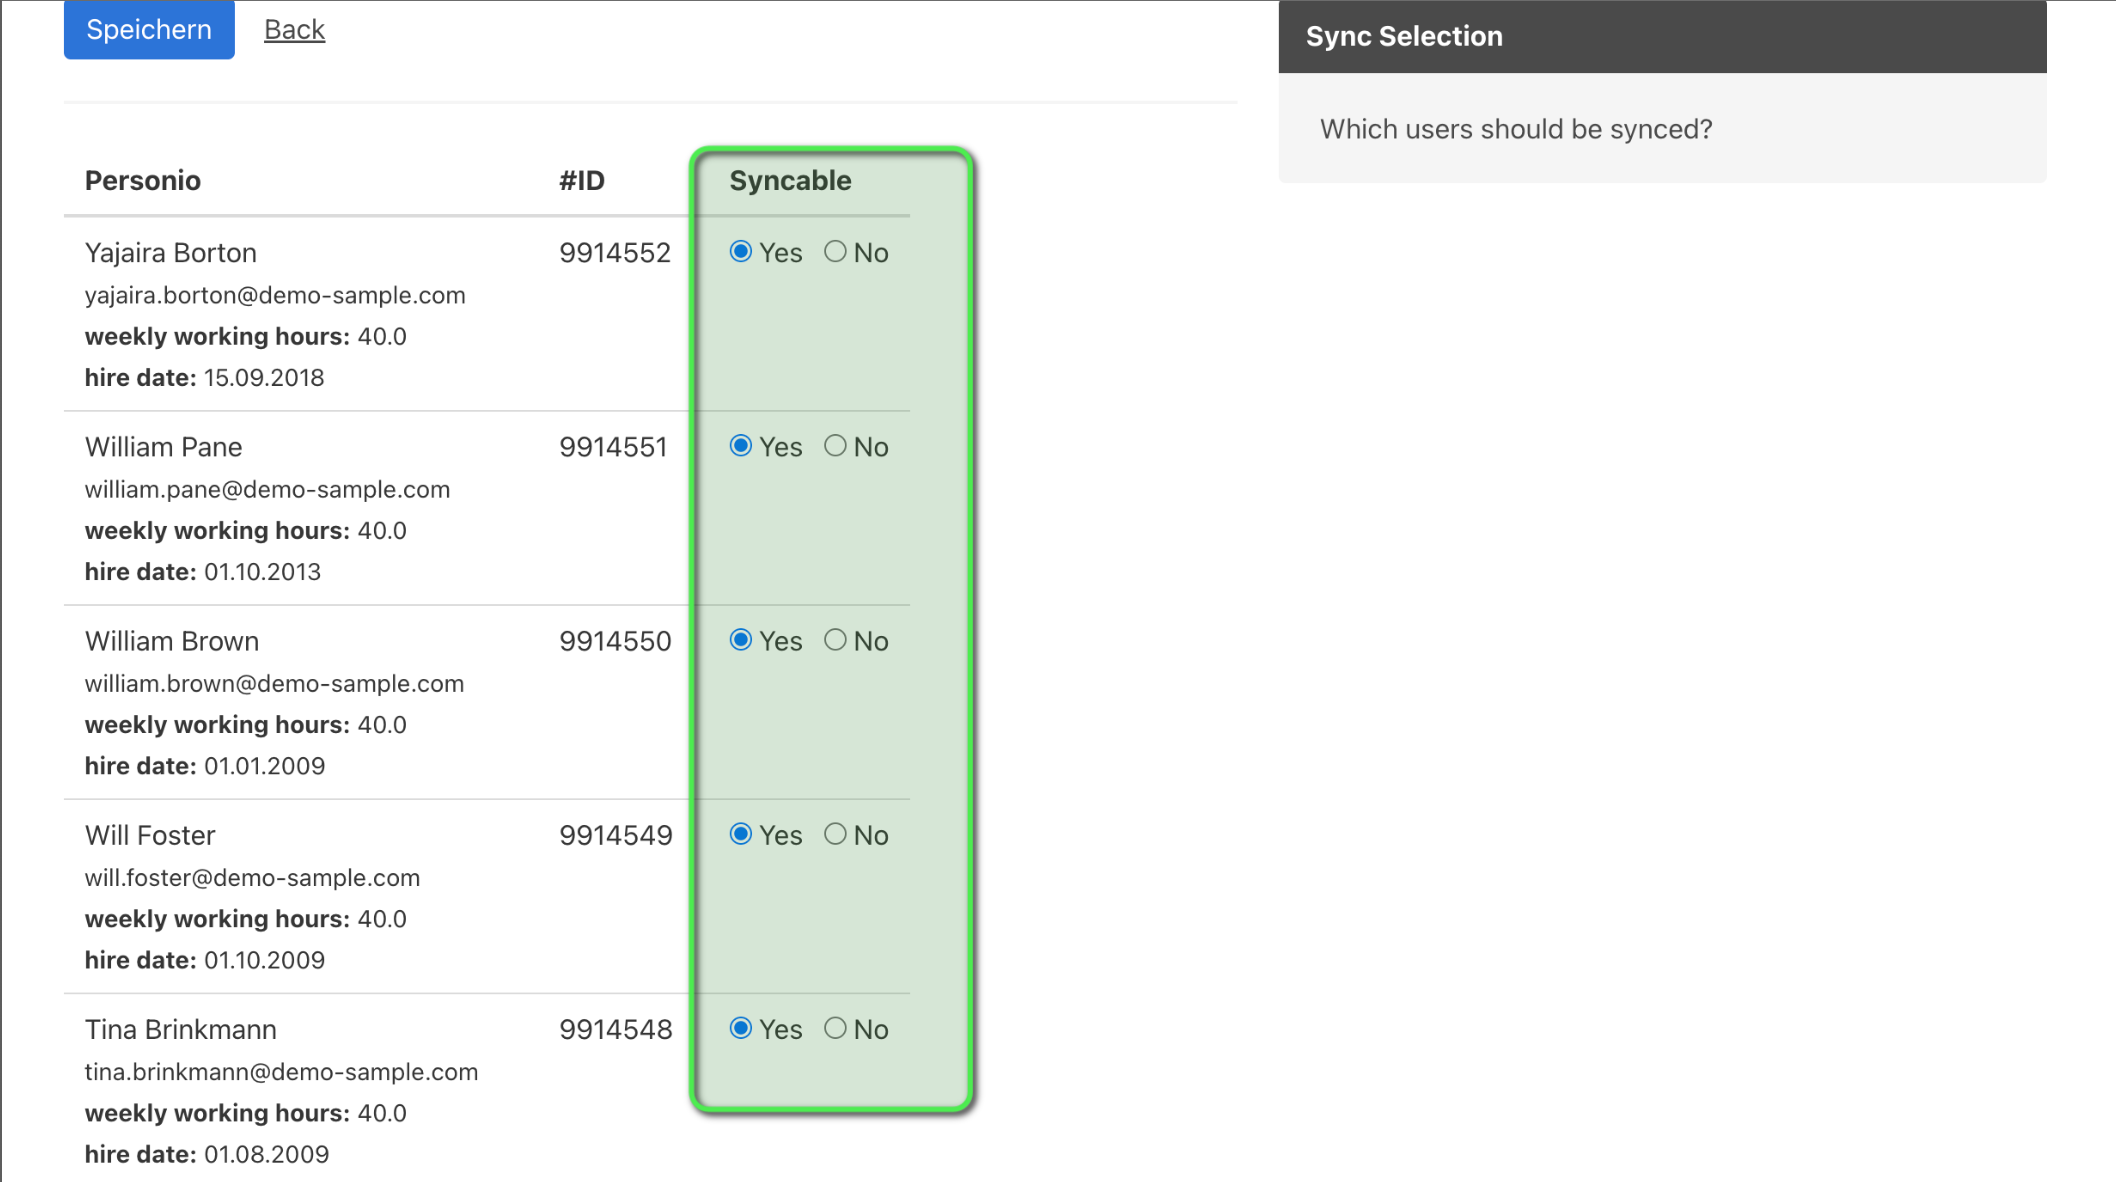
Now you can see all users that have been found in Personio. Now you have to decide which of these profiles should be transferred to Staffomatic. (3. Config users sync).
If a user profile is to be subsequently created and synchronized, data synchronization must be activated under item "3. Config user sync". The new user must be set to "Yes".
The last step is the individual fine tuning. In the following I explain the settings (4. Sync Options).
Enable background sync
This function is elementary and should be set to Yes. Only then can the API synchronize the data.
Enable personio hire date
This setting is useful if you want users to get access to Staffomatic only once the first working day is reached.
Enable personio last working day
Similar to the function above, this is about the last working day. When an employee leaves your company or "last working day" is reached, he is automatically locked and can no longer log into Staffomatic. (Attention: He will still be charged)
Only approved staffomatic absences
This setting only applies if you have selected Select sync sources Staffomatic as the leading system for absences in point 2. Here you can decide whether all requests should be transferred to Personio or only those that have been approved and rejected.
Only verified staffomatic work timers
This setting allows you to transfer either all completed records from the time tracking to Personio or only those that have the status Confirmed. You have the possibility to mark the records as Confirmed in the time tracking evaluation, if you have checked them. This feature minimizes the risk of transferring incorrect records to Personio.
Invite Saffomatic User
This setting sends invitations to the e-mail addresses of all users that you have set to Yes in item 3 Config User Sync. Please make sure that your employees are informed about this and accept the invitation. If you need more time, you can also invite your employees manually later.
The other settings are not important for the setup of the API and can be skipped.
Finally, please click on Save. The API is set up.
The first sync will take place in the morning or evening.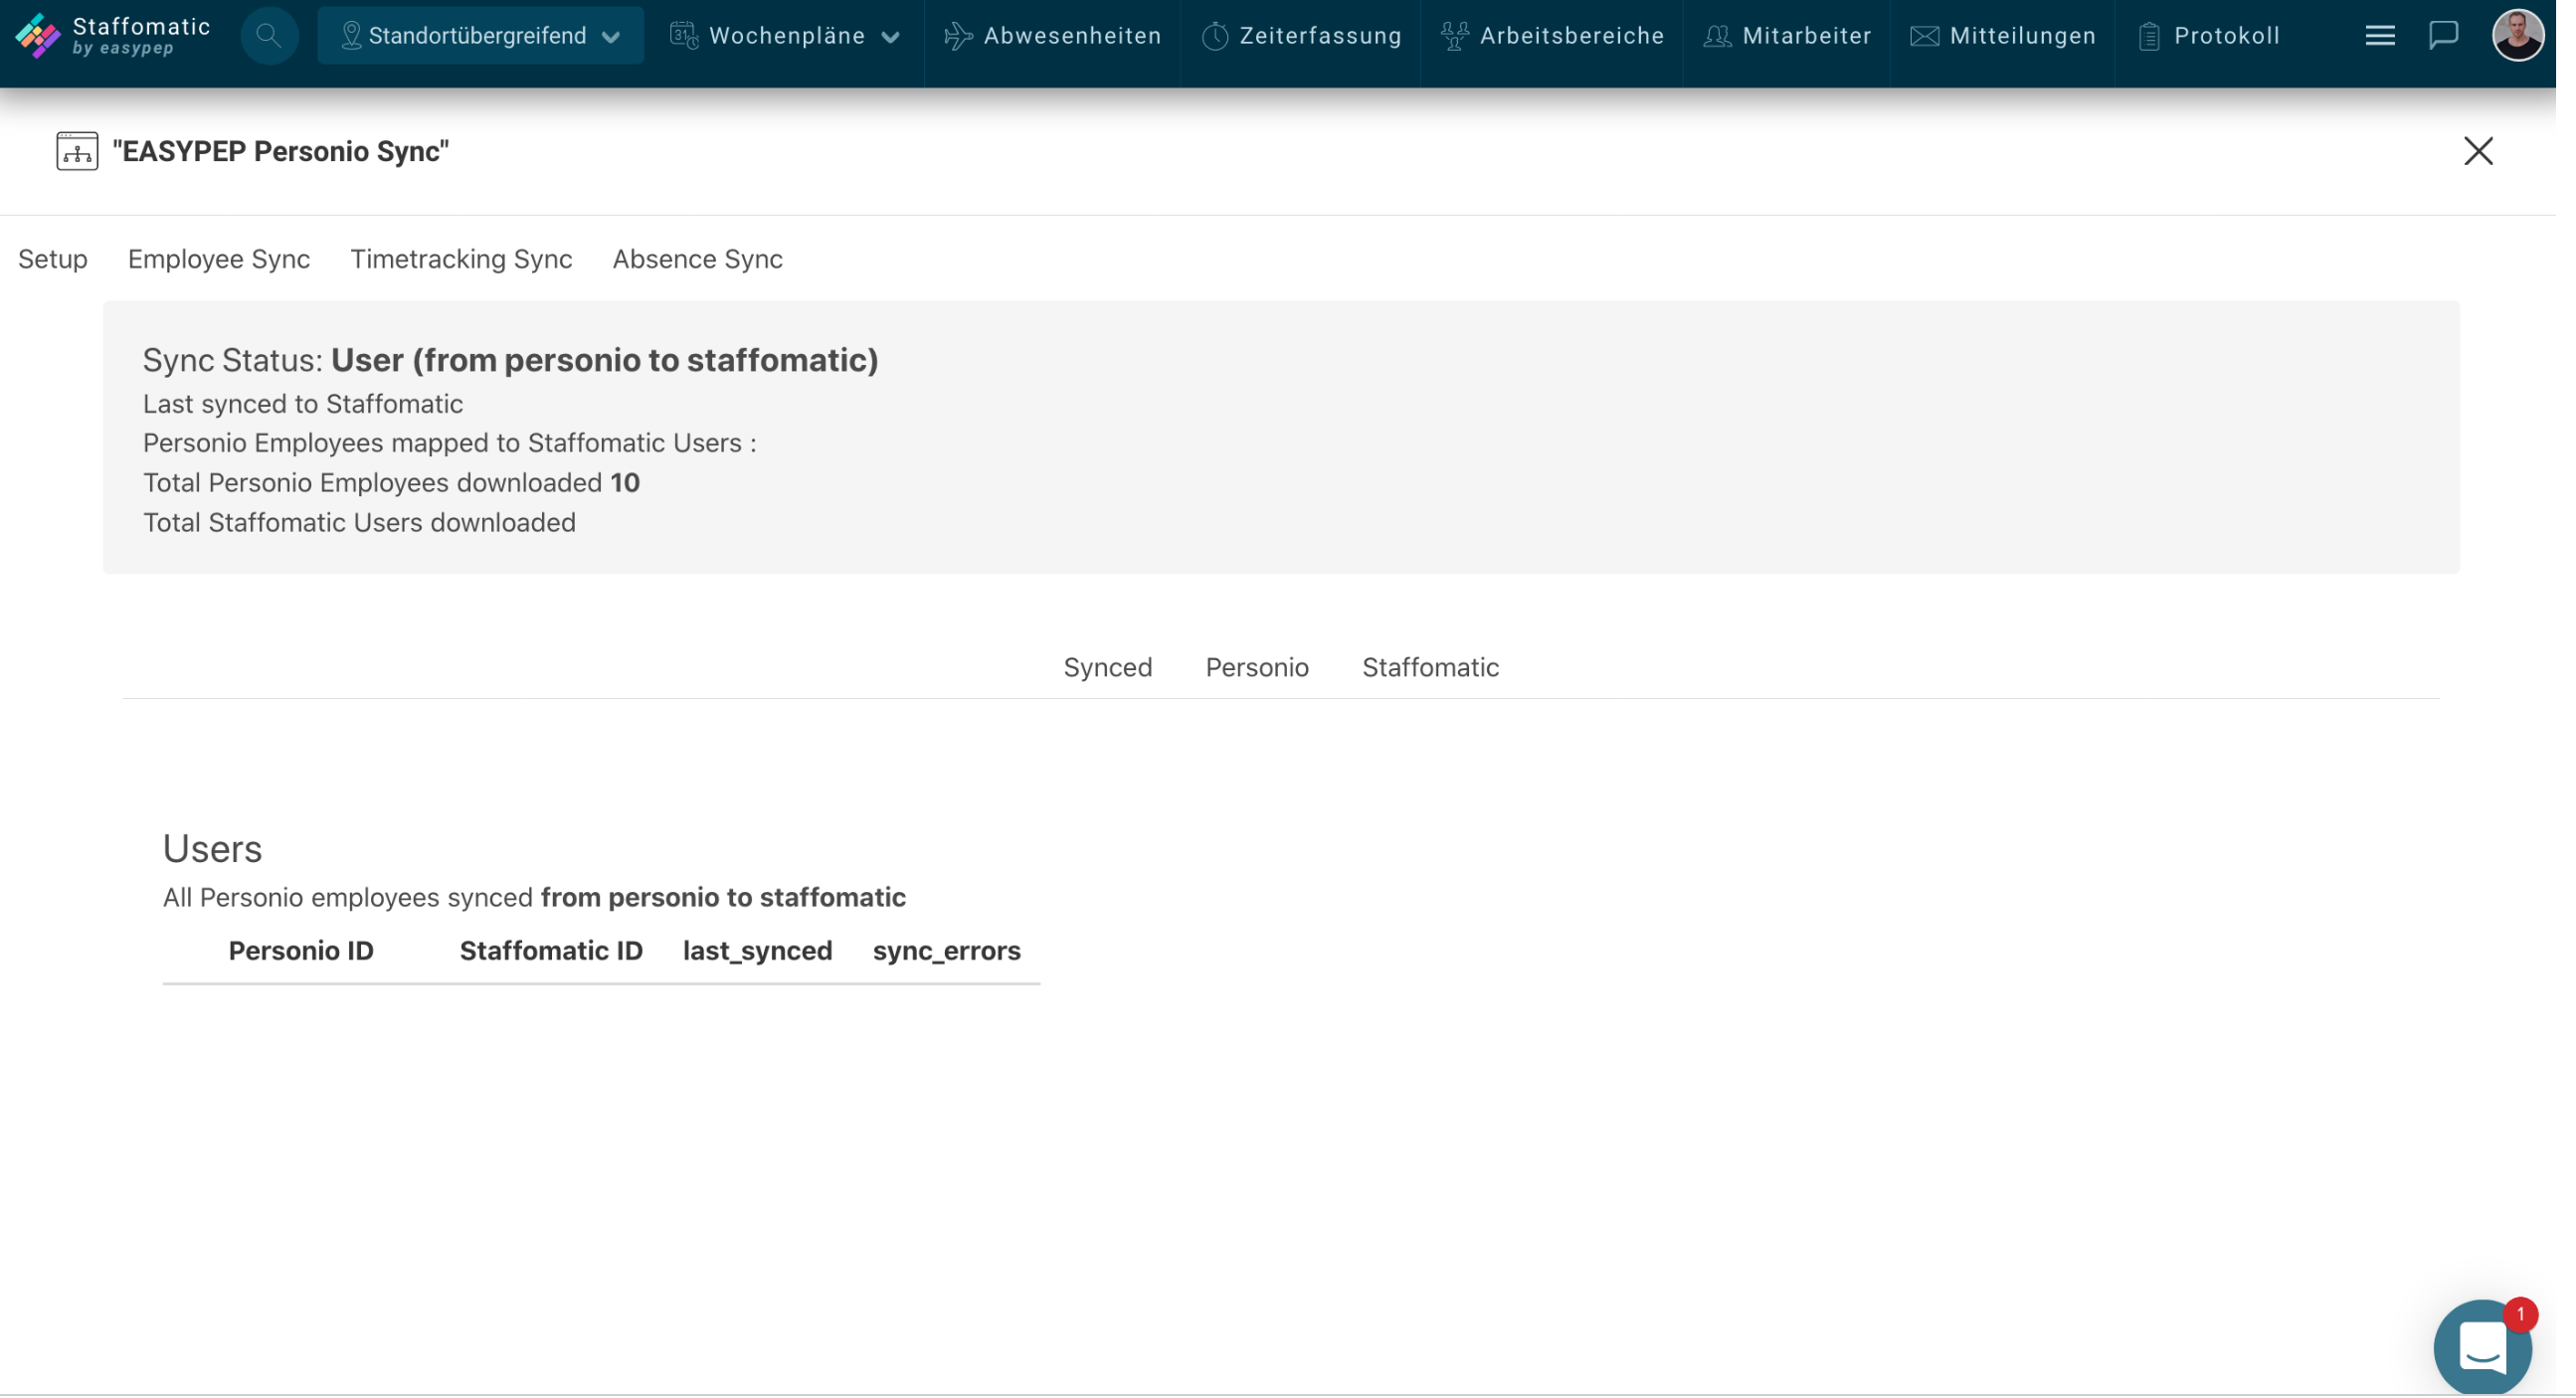
Create absence categories in Staffomatic
The last step is the manual creation of the absence categories in Staffomatic. Here it is important to use the same wording as in Personio.
Here is an example: If an absence category in Personio is called Paid Leave, it must also be called Paid Leave in Staffomatic. Only then the system can match the two categories.
FAQ
How do I start the integration in Staffomatic?
In order to start the API, after each logout from the whole account, the following steps must be performed to reinstall the API:
1) Click on the "Integration" tab.
2) Click on the button "More options" > "Remove integration" for the Personio API.
Now the API will jump down a bit. Just scroll down a bit please.
3) Click on the button "More options" > "Install integration" > "Install" again.
4) Finally just click on the blue button " Staffomatic <> Personio Sync" again.
Are all timers transferred at the time of sync?
Depending on the setting (should only confirmed timers be synced?), all timers that were completed or confirmed at the time of sync minus one hour (tendential start of sync) should be synced.
Are subsequent changes synchronized?
In general, changes are pushed.
If a record (absence or time tracking) is modified, it is recognized as a new record and pushed again during the next sync.
It is important that changes are made only in the tool that has been selected as the data source. If a change is made in the other tool, it will not be considered, and there will be no subsequent sync. For instance, if Staffomatic is the data source for time recording, and I modify a synchronized timer in Personio, it will have no impact.
How can I trigger the snyc?
In general, the following applies: Synchronizations are partly predetermined. With the synchronization between Staffomatic & Personio, an overall sync (employee data, time tracking, absences) called "Full Sync" usually takes place at 6:30 am. Deviations due to server capacity may occur. Additionally, a partial sync takes place every two hours. Here, the changes of the last four hours are synchronized.
Furthermore, it is also possible to manually perform a sync in the API as needed. A sync can be initiated in all areas (employee, time tracking, & absences). To do this, click on the designated "Sync Now" button.
How many days in the past will data be synced?
On the day a change is made in Staffomatic, attempts are made for 7 days to sync this change to Personio. In other words, all changes made in Staffomatic should also be synchronized to Personio accordingly. When Personio is set up for the first time, the data cannot be retrospectively calculated.
Are all timers and absences displayed in the API log?
In the log of timers and absences of the API of Staffomatic only the last two months are displayed.
Is an absence incl. status (confirmed/unconfirmed) synchronized?
If an absence is synchronized from Personio to Staffomatic, it has to be confirmed manually in Staffomatic afterwards.